Workflow automation: Creating conditional rules
Our workflow automation system got an upgrade in November 2021. Besides creating a dedicated automation page accessible through the project sidebar, we expanded the number of available actions and triggers, and we added several new features.
One of them is the ability to set up conditional rules in your project using KQL, the Kantree Query Language. Let’s have a closer look.
[Watch: Overview of Kantree Automations on YouTube]

First, a word about workflow automations
Work often involves repetitive and time-consuming tasks. Low-value work can feel tedious, slow you down, and negatively affect your productivity. One way to deal with that is by automating these tasks.
That’s why we have made sure that Kantree comes with a powerful and flexible system of automated actions. Once you automate recurring tasks, you will have more time for high-value projects.
[Related reading: 6 ways to save time at work with Kantree]
Workflow automations are time-saving commands in your workspace, such as a kanban or table. An action gets triggered according to the rules you set up in the system. It will continue until you pause or delete the setting.
Simple vs complex auto actions
Automation can be as simple as assigning a team member to a task when a card gets moved from one group to another (e.g. from the “Ideas” to “To Do” column in a kanban board). That way you don’t have to send them a message every time.
You can also chain a number of actions together to create a complex system of commands in the workflow, or combine auto actions with manual triggering.
Going even further, you can set up conditional rules in the branches of the automation tree. It’s not as complicated as it may sound!
[View our Automations playlist on YouTube]
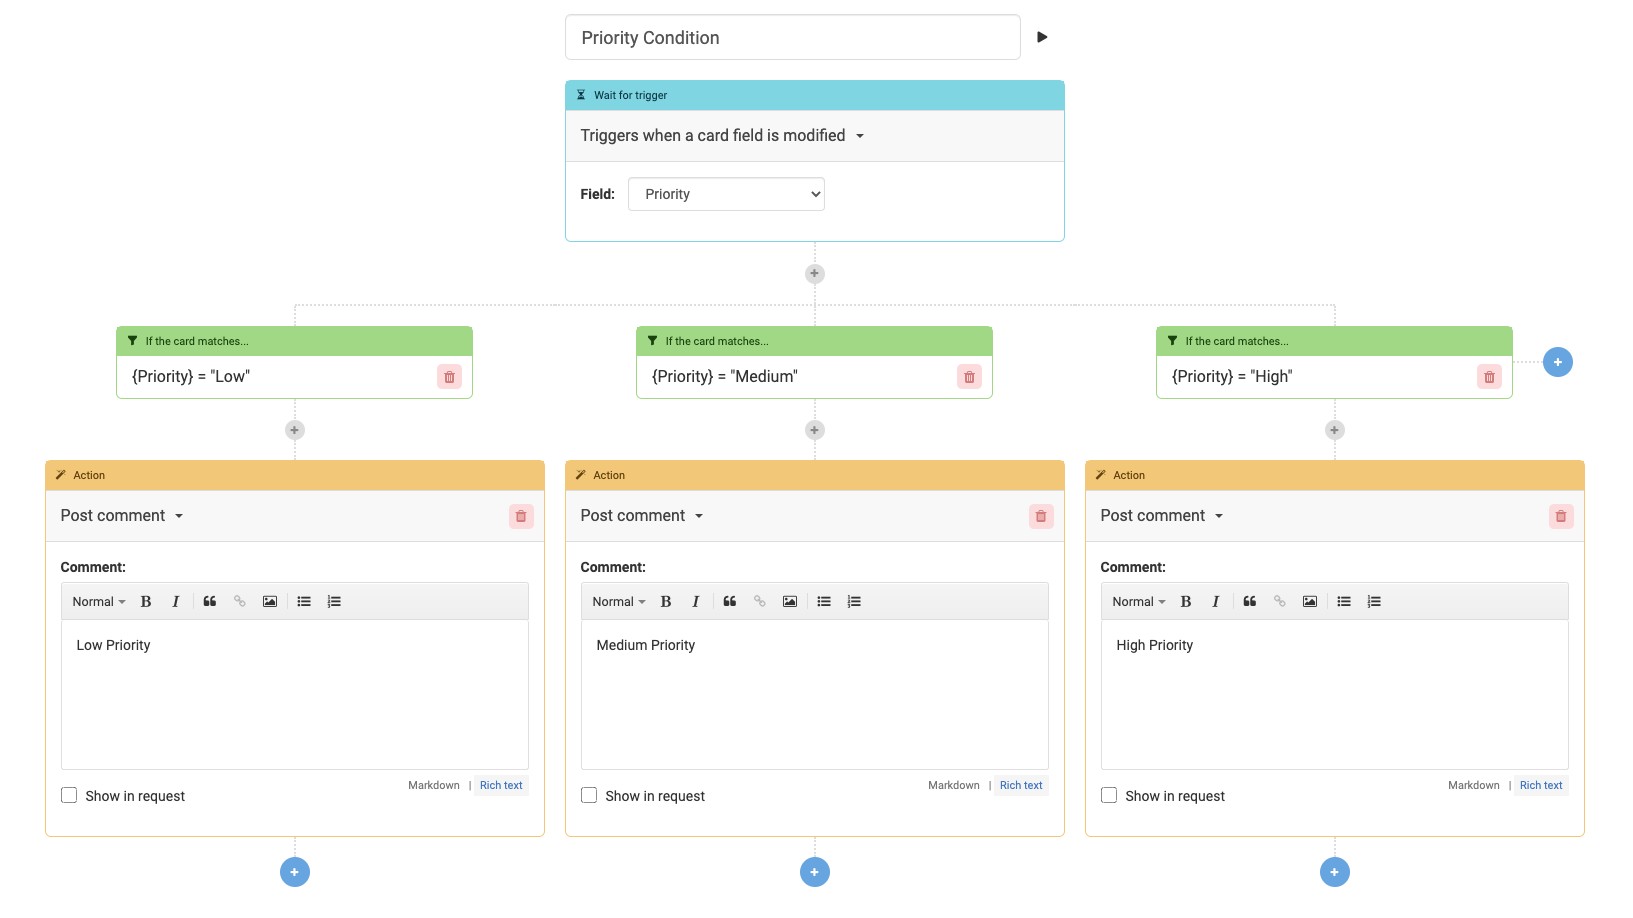
 Example of a priority condition on the automation page, which utilises the Kantree Query Language (KQL) to create auto actions based on a task’s priority level.
Create next-level automation with conditional rules
This feature was added to let you create more complex and custom automations in your workflow (we know that a lot of our users will welcome this addition).
What is it: Using the Kantree Query Language (KQL) in conditional branches of the automation system (pictured), you have the ability to first evaluate variables in a card, and then set up very precise rules before an action gets activated.
Real-life example: We added a priority field to the cards in our workspace, with the options being “Low,” “Medium,” and “High.” Now, whenever the priority level changes, Kantree will automatically post a comment in the card, informing our team of the level change - no need to notify them manually every time. We did this by creating a priority condition in the automation page of the workspace.
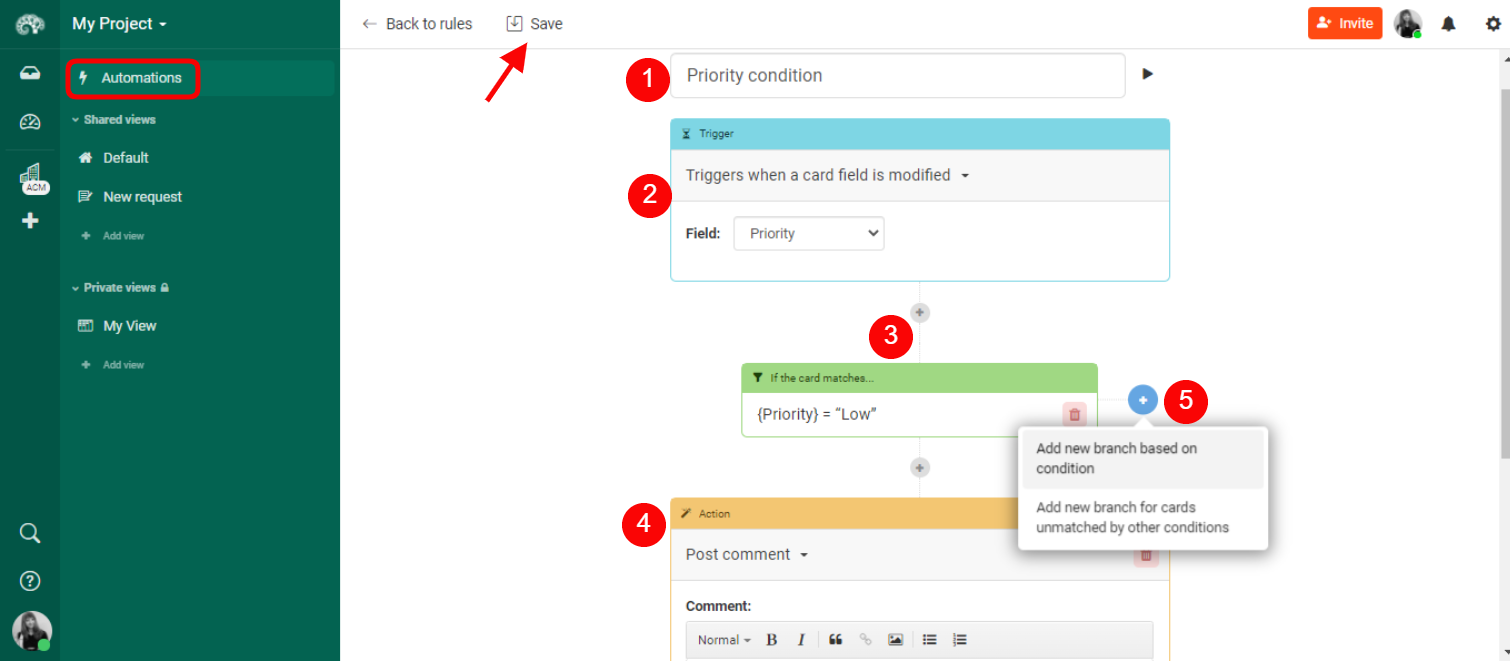
 To set up conditional rules, go to the automation page, add a trigger and start building branches using KQL, then linking them to desired actions.
How it works: To get a feel for using conditional branches, watch the video below and follow these simple steps below to recreate the example from our screenshot.
- Add a priority field to your card, then define field options (“Low,” “Medium,” High”).
- Go to the automation page of your workspace.
- Click “Add automation” and select “Triggers when a card field is modified” and choose “Priority field.”
- Click on the ➕ icon, add “Conditional branches,” and type a condition using KQL. In this case {Priority} = “Low”.
- Click on the ➕ icon below the conditional branch and choose an action for Kantree to perform. In this example, “Publish a comment.” Type and save.
- Add medium and high priority conditions by clicking the ➕ icon on the right, selecting “Add new branch based on condition,” and typing KQL conditions: {Priority} = “Medium” and {Priority} = “High”.
Follow our public roadmap and be a part of building Kantree! Users can submit ideas and comment on in-progress items. Questions? Email us.